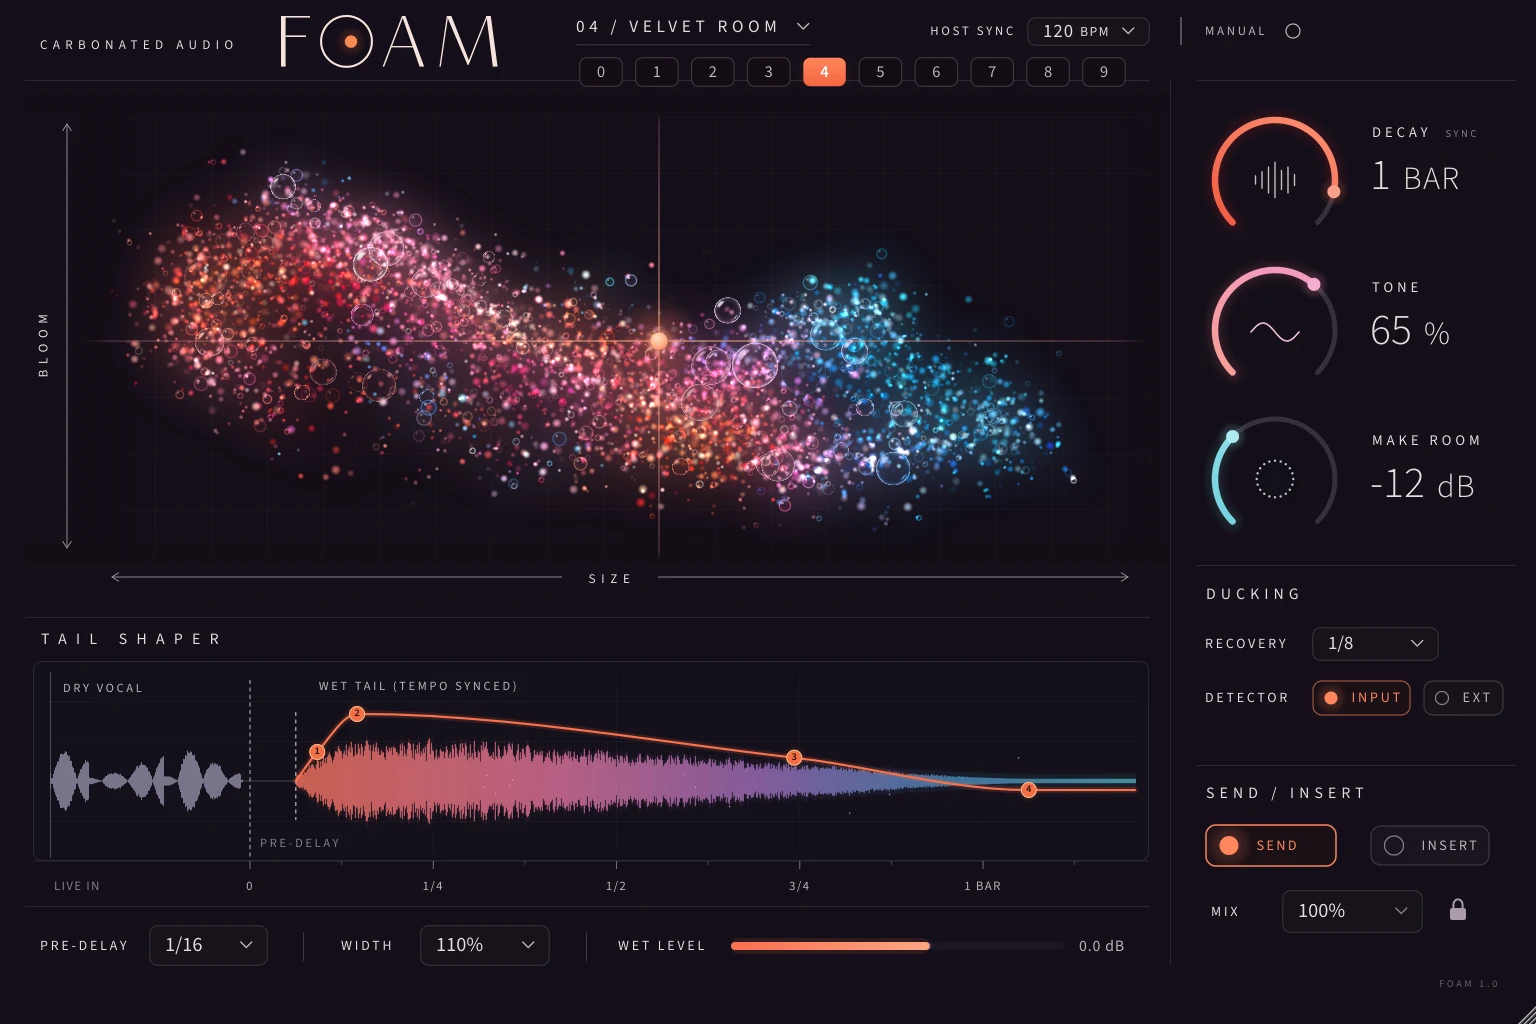
FOAM - User Manual
Carbonated Audio · v1.0.0
Ducking reverb with a drawable tail. VST3, AU and AAX for macOS, VST3 for Windows.
This manual covers installing FOAM, activating your license, every control on the interface, the ten factory spaces, and how the ducking works. If you only read one section, read Quick start, then Ducking - that is the part that makes FOAM different from a normal reverb.
1. Overview
FOAM is an algorithmic reverb built around one problem: a long, lush tail that buries the words it was meant to sit behind. FOAM answers it two ways.
- It ducks itself. A detector listens to the source (or to a sidechain key) and pushes the reverb's output down while the source is playing, then lets it bloom back in the gaps. The tail keeps running underneath, so nothing is cut off when it comes back up.
- You draw the tail. The Tail Shaper shows the reverb's envelope on a real time axis, with four nodes you drag to set the early reflections, when the tail arrives, how much body it has, and how long it lasts.
Everything else is built to stay out of your way: zero latency, Decay, Pre-Delay and ducking Recovery that can each lock to your project tempo, and ten factory spaces to start from.
| Spec | Value |
|---|---|
| Formats | macOS: VST3, AU, AAX. Windows: VST3 |
| System | macOS 11 or later, one universal build for Apple Silicon and Intel. Windows 10 or 11, 64-bit |
| Channels | Mono or stereo in, stereo out. Optional mono or stereo sidechain input |
| Latency | 0 samples. No lookahead anywhere in the signal path |
| CPU | Under 1% of one core on an Apple M4 at 48 kHz |
| License | 3 machines per license. Activate once online, works offline after that |
On Windows FOAM is a 64-bit VST3. There is no Windows AAX yet, so Pro Tools on Windows is not supported.
2. Installing
- Download
FOAM-Installer.pkgfrom the link in your receipt email, or from the button at the top of this page. - Double-click it and follow the installer. It is signed and notarized, so macOS opens it without a warning.
- Rescan plugins in your DAW if it does not pick FOAM up on its own.
The installer puts each format in the standard system folder:
| Format | Location |
|---|---|
| VST3 | /Library/Audio/Plug-Ins/VST3/FOAM.vst3 |
| AU | /Library/Audio/Plug-Ins/Components/FOAM.component |
| AAX | /Library/Application Support/Avid/Audio/Plug-Ins/FOAM.aaxplugin |
FOAM appears under Carbonated Audio in your plugin list. The AAX is signed for Pro Tools.
Installing on Windows
- Download FOAM-Windows-Installer.exe from the link in your receipt email or here.
- Quit your DAW.
- Run the installer. It puts the 64-bit VST3 in
C:\Program Files\Common Files\VST3\FOAM.vst3, the folder every VST3 host scans by default. If Windows shows a "Windows protected your PC" screen, click More info, then Run anyway. - Launch your DAW and let it rescan.
Windows is VST3 only. If your host is 32-bit or VST2-only, FOAM will not appear in it. To remove FOAM, use Settings > Apps.
3. Activating your license
The first time you open FOAM, the ACTIVATE FOAM window covers the interface.
- Copy the license key from your receipt email.
- Paste it into the field and press activate. FOAM contacts the activation server once and shows how many of your 3 machines are in use.
- That's it. Every launch after that is offline - no account, no dongle, no check-ins.
Until FOAM is activated it adds no reverb: in Send mode it outputs silence, in Insert mode it passes your dry signal through untouched. Nothing in your session breaks while you sort out a key.
One license covers 3 machines. To move an activation to a new computer, email mixedbysoda@gmail.com and we'll reset one. The activation record lives at ~/Library/Application Support/Carbonated Audio/foam.activation on macOS and %APPDATA%\Carbonated Audio\foam.activation on Windows.
4. Quick start
The classic FOAM move is a big vocal reverb that gets out of the way of the words.
- Put FOAM on an aux / return track and send the vocal to it.
- Leave the routing on SEND (the default). FOAM outputs reverb only.
- Pick a space from the strip at the top. 04 / VELVET ROOM is the default and a good start; 06 / WIDE HALL or 08 / DEEP FIZZ for something bigger.
- Turn MAKE ROOM up to around
-12to-18 dB. Watch the ring in the middle of the knob - that is the reduction being applied right now. - Set RECOVERY to taste.
1/8(the default) blooms back quickly between phrases;1/4or longer keeps the reverb tucked down through short gaps. - Bring the return fader up until the tail feels big in the gaps. Because of the ducking you can usually run it louder than you would a normal reverb.
On a single track instead of a send, switch to INSERT and use MIX to blend.
5. The interface
FOAM is one window with no pages or hidden tabs. From top to bottom:
| Area | What lives there |
|---|---|
| Header | Space name, the ten-space strip, tempo readout (HOST SYNC / MANUAL) |
| Cloud (big centre panel) | The SIZE x BLOOM pad. The particle cloud is the reverb, drawn live |
| Right column | DECAY, TONE and MAKE ROOM knobs, then DUCKING (Recovery, Detector) and SEND / INSERT (Mix) |
| Tail Shaper | The reverb envelope on a time axis with four draggable nodes |
| Bottom strip | PRE-DELAY, WIDTH, WET LEVEL |
How the controls respond
| Control type | Gesture | Result |
|---|---|---|
| Knobs (Decay, Tone, Make Room) | Drag up / down | Change the value. Hold Shift for fine control |
| Mouse wheel | Nudge the value | |
| Double-click | Reset to default | |
| Right-click | Type a value. On Decay, opens the sync / free-time menu | |
| Value boxes (Pre-Delay, Recovery, Width, Mix, BPM) | Click | Open the menu of common values |
| Drag up / down | Change the value. Synced times step through note values | |
| Double-click | Type a value. On a time box this also switches it to free time | |
| Cloud pad | Click / drag | Set Size (left-right) and Bloom (up-down) together |
| Double-click | Re-centre (Size 50%, Bloom 50%) | |
| Wet Level bar | Click / drag | Set the wet level |
| Double-click | Reset to 0 dB | |
| Tail Shaper nodes | Drag | See Tail Shaper |
Every control writes host automation, and each drag is recorded as one gesture.
6. Spaces
The strip under the space name holds ten factory spaces. Click one in the strip, or click the name (for example 04 / VELVET ROOM) for a list. A space is a starting point, not a separate algorithm - every space runs through the same engine, and you can move anything after loading one.
Loading a space sets Size, Bloom, Decay, Tone, Width, Pre-Delay and the four Tail Shaper nodes. It never touches Routing, Mix, Wet Level, the tempo source or any ducking setting, so you can audition spaces on a mix without your ducking or levels jumping around.
| # | Space | Size | Bloom | Decay | Tone | Width | Pre-Delay |
|---|---|---|---|---|---|---|---|
| 00 | TIGHT BOOTH | 8% | 30% | 0.35 s | 60% | 80% | 4 ms |
| 01 | SMALL ROOM | 18% | 40% | 0.60 s | 62% | 100% | 8 ms |
| 02 | WARM STUDIO | 30% | 50% | 0.90 s | 45% | 105% | 12 ms |
| 03 | GLASS PLATE | 35% | 85% | 1.60 s | 85% | 120% | 15 ms |
| 04 | VELVET ROOM (default) | 50% | 50% | 1 BAR | 65% | 110% | 1/16 |
| 05 | STONE CHAMBER | 58% | 60% | 1 BAR | 50% | 115% | 1/32 |
| 06 | WIDE HALL | 75% | 65% | 2 BARS | 60% | 140% | 1/16 |
| 07 | CATHEDRAL | 95% | 70% | 6.50 s | 50% | 130% | 45 ms |
| 08 | DEEP FIZZ | 65% | 100% | 2 BARS | 90% | 150% | 1/16 |
| 09 | ENDLESS FOAM | 100% | 90% | 4 BARS | 70% | 160% | 1/8 |
Spaces with a note value (1 BAR, 1/16 and so on) load tempo-synced; the others load in free time.
The space selector is deliberately not automatable: one click rewrites a dozen parameters, and that should be a decision you make, not something an automation lane does behind your back. FOAM 1.0 has no user preset browser - save your own settings with your DAW's preset or channel-strip save. The full state, including every Tail Shaper node, is stored with it and with your session.
7. The cloud: Size and Bloom
The big panel is an X/Y pad. The glowing puck sets two controls at once:
- SIZE (left to right, 0-100%) scales every delay line in the reverb, from about 0.38x to 1.75x of the space's natural dimensions. Decay time is held while you move it, so a bigger room does not automatically mean a longer tail - Decay does that.
- BLOOM (bottom to top, 0-100%) sets diffusion, the density inside the network and the depth of the internal modulation. Low Bloom is grainy and articulate, with individual reflections you can hear. High Bloom is a smooth, dense, slowly moving wash. Bloom is not a level control.
Size glides over about 120 ms when you change it, and like resizing a real delay, that bends the pitch of whatever is already ringing in the tail. That's by design and sounds natural on slow moves; for jumps, set Size before playback. Decay, Bloom, Tone and the levels are smoothed and never bend pitch.
The particle cloud is drawn from the audio, not from a loop. How much wet signal is coming out sets how many particles are born and how fast they move; Decay sets how long they live; Size spreads them sideways; Bloom adds turbulence and lift. When the ducking pushes the reverb down, the cloud gathers in and dims, then puffs back out as it releases.
8. Decay and Tone
DECAY
How long the tail takes to die away (the RT60 of the mid band). The tag under the value shows SYNC or FREE; click it, or right-click the knob, for the menu.
- Free time: 0.2 to 20 seconds.
- Tempo sync: 1/64 to 4 BARS, including dotted and triplet values (17 values in all). Default is
1 BAR.
A synced value always resolves to a real time between 0.1 and 30 seconds. If a note value at your tempo would land outside that, the readout shows the time actually in force instead of the note value, so the display never claims something the audio is not doing.
TONE
One knob for the top end of the tail, 0-100% (default 65%). Higher Tone keeps the highs alive for longer and opens up the wet top end; lower Tone makes the highs die off faster than the mids, the way soft furnishings and air absorb them in a real room. Low Tone is how you get a big reverb that does not fight the vocal's sibilance and air.
The wet signal also has a fixed 95 Hz low cut (12 dB per octave), so the tail never fills up the bottom of the mix.
9. Ducking: Make Room, Recovery, Detector
This is the part of FOAM that does the mixing for you.
MAKE ROOM
The maximum amount the reverb is turned down while the source is playing, from 0 dB (off) to -36 dB. Default -12 dB. More arc on the knob means more ducking. The ring in the middle of the knob is live: it shows the reduction being applied right now.
RECOVERY
How fast the reverb comes back once the source stops. After the set time it is about 90% of the way back, following a short 35 ms hold. Free time is 10 ms to 2 s; tempo sync uses the same note values as Decay (default 1/8).
- Short Recovery: the tail blooms into every small gap. Lively, obvious effect.
- Long Recovery: the reverb stays tucked down through short gaps and only opens up at the ends of phrases. More polished, less noticeable.
DETECTOR
- INPUT (default): the detector listens to what is coming into FOAM. On a vocal send, the vocal ducks its own reverb. No routing needed.
- EXT: the detector listens to FOAM's sidechain input instead. Use this to duck the reverb from something else - a lead vocal ducking a reverb on the backing vocals, or the kick ducking a reverb on the pad. Enable FOAM's sidechain input in your DAW and route the key to it. In Pro Tools the key input is mono.
If EXT is selected but nothing is arriving, FOAM says so under the Detector buttons: NO SIDECHAIN CONNECTED - NOT DUCKING when the sidechain input is not enabled, or KEY TOO QUIET OR SILENT - NOT DUCKING when it is enabled but no signal has arrived in the last couple of seconds. The EXT button also dims when no key signal is present.
How the detector behaves
The detector is a fast peak follower (1.5 ms attack) that starts pushing the reverb down at about -46 dBFS and reaches the full Make Room depth by about -26 dBFS. That window is fixed in 1.0; there is no threshold control. Gain reduction is stereo-linked, so the reverb image never shifts.
The ducking turns down the reverb's output only. The tail keeps building underneath at full strength, so when the ducking lets go you hear a tail that has been there all along, not one that is just starting.
10. Tail Shaper
The Tail Shaper draws the reverb's envelope to scale. On the left, DRY VOCAL and the LIVE IN scope show your input. Then the PRE-DELAY gap, then the WET TAIL curve, labelled TEMPO SYNCED or FREE TIME depending on Decay. The axis rescales to fit the tail, and freezes while you drag a node so it does not move under your mouse.
| Node | Drag | What it sets |
|---|---|---|
| 1 - Onset | Up / down | Level of the early reflections - the first, room-defining slap right after the pre-delay. High for an obvious room, low for a tail that fades in from nothing. |
| 2 - Build | Left / right | When the main tail arrives: from about 12 ms to 144 ms of delay and smear, never more than 8% of the decay time. Further right gives a swell, with space between the source and its reverb. |
| 3 - Body | Up / down and left / right | Up / down: how much of the long tail sits against the short, dense front part of the reverb. Left / right: how long the front part rings before it hands over to the tail. |
| 4 - Decay | Left / right | The end of the tail - the same parameter as the DECAY knob. In sync mode it snaps to the nearest note value. |
A short Body with a high level gives a thick, bloomy middle that falls away fast. A long Body with a low level gives a clean early sound with a quiet, long tail behind it. Loading a space resets all four nodes to that space's shape.
11. Pre-Delay, Width, Wet Level
PRE-DELAY
The gap between the dry sound and the start of the reverb. Free time 0-500 ms, or tempo-synced note values (default 1/16, synced). A synced value is limited to 4 seconds. Changes crossfade, so moving Pre-Delay never makes a pitch bend or a click. A little pre-delay is the simplest way to keep a vocal in front of a big reverb.
WIDTH
The stereo width of the wet signal, 0-200% (default 110%). 0% is a mono tail, 100% is the space's natural width, and above 100% the sides are pushed further out (up to about 1.45x at 200%). The level is compensated as you widen, so wider does not just mean louder. Width affects the reverb only, never your dry signal.
WET LEVEL
Output level of the reverb, -60 dB to +12 dB (default 0 dB). The readout at the right of the bar shows the value.
12. Send / Insert
- SEND (default): FOAM outputs reverb only. Use it on an aux / return. The MIX box shows
100%with a closed lock, because the dry signal is already in your mix. - INSERT: FOAM outputs dry and wet together, blended with MIX (0-100%, default 30%) using an equal-power curve, so the perceived level stays steady as you blend. Use it directly on a track.
Your Insert Mix value is kept while you are in Send mode, so switching back and forth does not lose it. Switching routing never changes the reverb itself.
Bypass
Bypassed in Insert mode, FOAM passes your dry signal. Bypassed in Send mode, it outputs silence (your dry is already in the mix). The reverb is cleared when you bypass, so a tail does not resume from where it stopped. In Insert mode that means the tail stops sharply at the moment of bypass.
13. Tempo
Decay, Pre-Delay and Recovery can each follow tempo independently. The header shows where the tempo comes from:
- HOST SYNC: FOAM is following your DAW's tempo, shown in the BPM box.
- NO HOST: the host is not sending a tempo, so FOAM falls back to the manual BPM.
- MANUAL: FOAM ignores the host and uses its own BPM. Click the dot next to MANUAL to toggle it.
Click the BPM box for Follow host tempo, Manual tempo or Type BPM.... Double-click it to type a tempo. In manual mode you can also drag it. Manual BPM runs from 40 to 300 (default 120). Bar-length values follow the host's time signature.
14. Recipes
Big vocal that stays out of the way
Send mode, WIDE HALL or DEEP FIZZ, Make Room -18 dB, Recovery 1/4, Tone around 45-55%, Pre-Delay 1/16. Push the return louder than feels sensible.
Rhythmic tail on a snare
Send mode, STONE CHAMBER, Decay synced to 1/2, Recovery 1/16, Node 2 pulled right for a swell into the next beat.
Reverb on a pad ducked by the lead
Insert on the pad, Mix around 40%, Detector EXT, lead vocal routed to FOAM's sidechain, Make Room -24 dB, long Recovery so the reverb only opens up between phrases.
Tight room for presence, not space
TIGHT BOOTH or SMALL ROOM, Node 1 high, Body short and low, Width 80-100%, Make Room off. Low enough in the mix that you feel it more than hear it.
15. Troubleshooting
| Problem | Fix |
|---|---|
| FOAM makes no sound / passes only dry | It is not activated yet. Open the interface and enter your key. Unactivated, Send is silent and Insert passes dry. |
| Activation fails | Check the key was pasted whole, and that this Mac is online for the one-time activation. If it says all 3 machines are in use, email us for a reset. |
| No ducking | Make Room is at 0 dB, or the source is very quiet (below about -46 dBFS). With EXT selected, read the message under the Detector buttons: the sidechain is not enabled or no key signal is arriving. |
| The reverb ducks too much / pumps | Back Make Room off toward -6 dB and lengthen Recovery. |
| Pitch wobble when I move Size | Expected: Size changes the reverb's delay lengths. Set it before playback, or automate it slowly. |
| Synced Decay shows seconds instead of a note value | The note value at this tempo is outside 0.1-30 s, so FOAM shows the time it is really using. |
| Tail stops abruptly when I bypass | In Insert mode the reverb is cleared on bypass. Automate Wet Level or Mix down instead if you need a natural fade. |
| FOAM doesn't show up in my DAW | Rescan plugins. Check the format is in the folder listed in Installing. FOAM needs macOS 11 or later, or 64-bit Windows 10 or 11. |
| Is there a Windows version? | Yes, VST3 for 64-bit Windows 10 and 11. See Installing on Windows. No Windows AAX yet. |
16. Support
License resets, bug reports, install trouble, or a question about what FOAM will do to a particular part - mixedbysoda@gmail.com. Include your DAW, your macOS or Windows version and the plugin format if it's a technical problem; it saves a round trip.
Product page and purchase: carbonatedaudio.com/foam.
Questions, bug reports, or sound-design notes: mixedbysoda@gmail.com.